DewPoint
Turn a database question into a dashboard you can check.
DewPoint is an agent skill and dashboard app for people who make decisions with data they already have access to. Connect a database, tell DewPoint what you need to decide, and give the key figures a place you can return to. Inspect the definitions and data model behind the charts, then refine the dashboard by chatting.
- Start with a question. Ask about completed revenue by region, ticket resolution by team, or another measure that drives a decision.
- Check the calculation. Review the source tables, measure, filters, and grouping. The skill queries the charts against your database before saving.
- Keep the dashboard. Open it in DewPoint and return to the figures as the source data changes.
Website source · Skill definition · Validation and research
Explore the website
From the repository root, start the static preview.
python3 site/preview.py
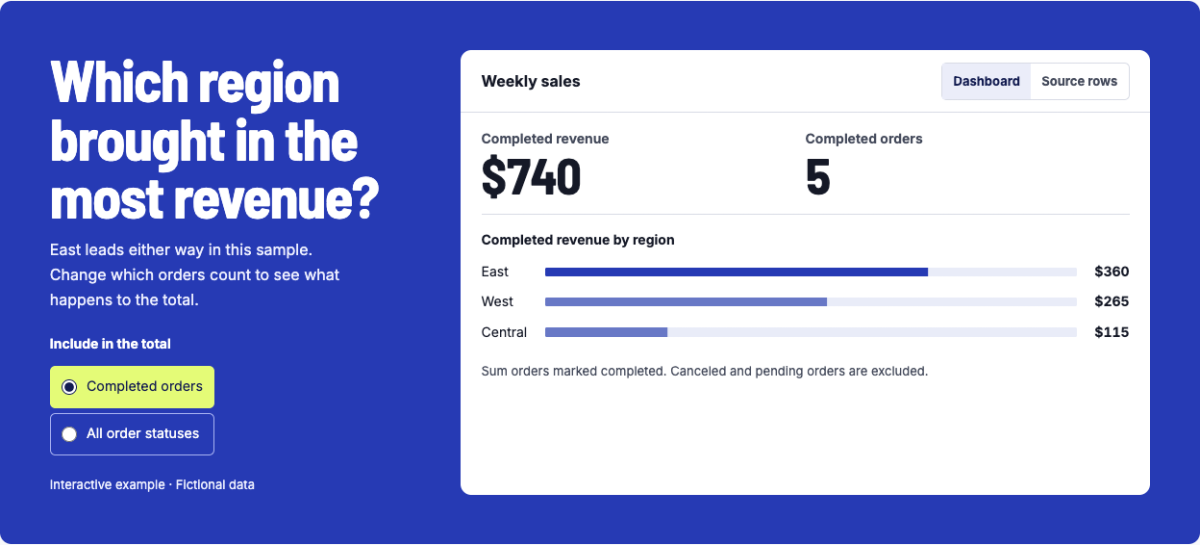
Open the local URL printed by the server. The overview lets you change which orders count and inspect the source rows.
- How it works traces the data paths and compares DewPoint with Metabase and ChatGPT file analysis.
- Worked examples cover sales, support, and operations with fictional data you can reproduce in SQLite.
- Metric field guide shows how to check joins, rates, and reporting periods before using a figure in a decision.
- Get started shows how to add DewPoint to Claude Desktop, connect to your team’s instance from Cowork, and build your first dashboard.
Try the skill
For Claude Desktop, download the skill from Get started. In Claude, open Customize → Skills and enable the DewPoint skill. Upload the ZIP if your team has not provided the skill. Open Cowork and use the approved HTTPS API address for your team's DewPoint instance. Claude skill setup
Try the skill with another agent
Use an available DewPoint instance and a checkout containing skills/dewpoint. If you’re hosting DewPoint locally, follow the host setup. Install the skill using your agent’s skill instructions. The commands below show the Codex installation from the repository root.
mkdir -p .agents/skills
cp -R skills/dewpoint .agents/skills/
Open a Codex session in the checkout and type $dewpoint. Connect an approved read-only database through the DewPoint app, or use the sample below. The skill can also work with a workspace you've already created. How Codex discovers local skills
Try the example
Create a SQLite database from the same fictional orders used on the landing page.
sample_dir="$(mktemp -d)"
sqlite3 "$sample_dir/orders.db" < site/example.sql
printf '%s\n' "$sample_dir/orders.db"
Replace /path/to/orders.db in this prompt with the path printed above.
$dewpoint Connect the sample SQLite database at /path/to/orders.db. Show completed revenue and order counts by region for the retail operations team. Count only completed orders, use USD, and save a dashboard.
The sample has five completed orders totaling $740. East contributes $360, West $265, and Central $115. The example excludes a $120 canceled order and a $90 pending order. In the DewPoint app, select the created workspace and open Dashboards.
You can also create a workspace from a CSV, Excel or JSON file, a ZIP of those files, or a URL to a file. See supported database connections.
Setup
Needs Python 3.10+, Node 18+ for the frontend, Node 20 or 22 for Cube, Postgres 14+, uv and an LLM API key.
Run each setup block from the repository root in its own terminal when it starts a service.
The commands below use Homebrew on macOS. On other systems, install the same dependencies with your package manager and use the corresponding psql and Node paths.
1. Postgres (once)
brew install postgresql@17 && brew services start postgresql@17
1.1 Set up the Postgres database (once)
/opt/homebrew/opt/postgresql@17/bin/psql postgres -f backend/sql/setup.sql
2. Cube
Use Node 22.
brew install node@22
cd cube && cp .env.example .env    # set CUBEJS_API_SECRET to a long random string
PATH=/opt/homebrew/opt/node@22/bin:$PATH npm ci
PATH=/opt/homebrew/opt/node@22/bin:$PATH npm run dev
3. Backend
cd backend
cp .env.example .env    # set the LLM key and match CUBE_API_SECRET to Cube's CUBEJS_API_SECRET
uv sync --extra dev
uv run uvicorn app.main:app --reload --port 8000
4. Frontend
cd frontend && npm install && npm run dev
5. Open DewPoint
Open http://localhost:5173 to create a workspace or view one created by the skill.
Connect client database
Add a new Workspace and Connect a database on the new-workspace page.
Examples of database connection URLs:
| Database | URL | Driver |
|---|---|---|
| Postgres | postgresql://user:pass@host:5432/db |
included (psycopg) |
| DuckDB | duckdb:////path/to/file.duckdb |
included |
| DuckDB server (Quack) | duckdb+quack://localhost:9494 (also quack:localhost:9494; ?token=… if it needs one) |
included |
| SQLite | sqlite:////path/to/file.db |
included |
| BigQuery | bigquery://project/dataset |
connectors extra |
| Snowflake | snowflake://user:pass@account/db/schema?warehouse=wh |
connectors extra |
| Oracle | oracle+oracledb://user:pass@host:1521/?service_name=svc |
connectors extra |
| MySQL / MariaDB | mysql://user:pass@host/db |
connectors extra |
(uv sync --extra connectors; SQL Server, Redshift, ClickHouse and Trino work with their own
SQLAlchemy dialect installed.)
DewPoint queries connected databases live and stores their connection settings encrypted in its Postgres instance. Workspace setup can send column statistics and data samples to the chosen LLM provider. To disable local prompt and context logging, set LLM_LOG_PROMPTS=off and LLM_CONTEXT_LOG=false in backend/.env.